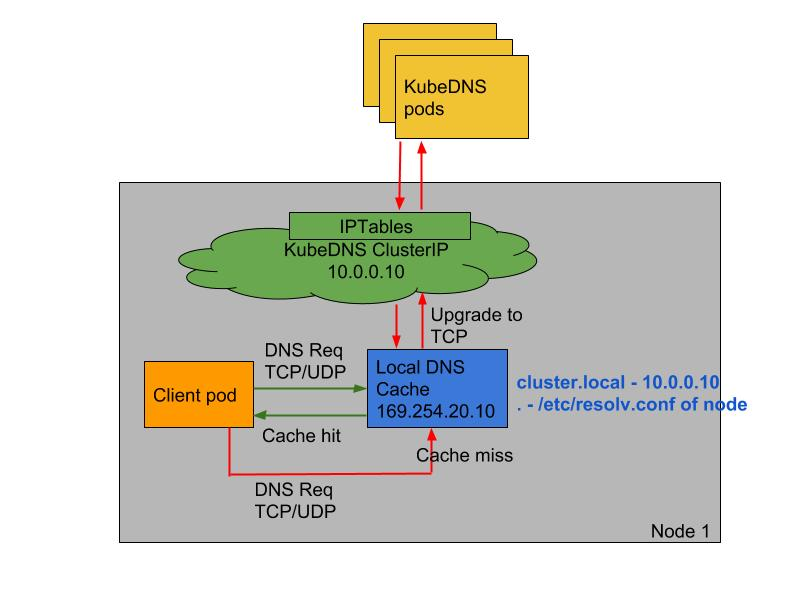
NodeLocal DNS使用及配置 NodeLocal DNSCache 通过在集群节点上运行一个 DaemonSet 来提高 clusterDNS 性能和可靠性。处于 ClusterFirst 的 DNS 模式下的 Pod 可以连接到 kube-dns 的 serviceIP 进行 DNS 查询。通过 kube-proxy 组件添加的 iptables 规则将其转换为 CoreDNS 端点。通过在每个集群节点上运行 DNS 缓存,NodeLocal DNSCache 可以缩短 DNS 查找的延迟时间、使 DNS 查找时间更加一致,以及减少发送到 kube-dns 的 DNS 查询次数。
在集群中运行 NodeLocal DNSCache 有如下几个好处:
如果本地没有 CoreDNS 实例,则具有最高 DNS QPS 的 Pod 可能必须到另一个节点进行解析,使用 NodeLocal DNSCache 后,拥有本地缓存将有助于改善延迟
跳过 iptables DNAT 和连接跟踪将有助于减少 conntrack 竞争并避免 UDP DNS 条目填满 conntrack 表(常见的5s超时问题就是这个原因造成的)
从本地缓存代理到 kube-dns 服务的连接可以升级到 TCP,TCP conntrack 条目将在连接关闭时被删除,而 UDP 条目必须超时(默认 nf_conntrack_udp_timeout 是 30 秒)
将 DNS 查询从 UDP 升级到 TCP 将减少归因于丢弃的 UDP 数据包和 DNS 超时的尾部等待时间,通常长达 30 秒(3 次重试+ 10 秒超时)
要安装 NodeLocal DNSCache 也非常简单,直接获取官方的资源清单即可:
1 wget https:// raw.githubusercontent.com/kubernetes/ kubernetes/master/ cluster/addons/ dns/nodelocaldns/ nodelocaldns.yaml
该资源清单文件中包含几个变量,其中:
__PILLAR__DNS__SERVER__ :表示 kube-dns 这个 Service 的 ClusterIP,可以通过命令 kubectl get svc kube-dns -n kube-system -o jsonpath={.spec.clusterIP} 获取__PILLAR__LOCAL__DNS__ :表示 DNSCache 本地的 IP,默认为 169.254.20.10__PILLAR__DNS__DOMAIN__ :表示集群域,默认就是 cluster.local
如果kube-proxy使用Iptable模式
1 sed -i "s/__PILLAR__ LOCAL__DNS__ /$localdns/g; s/__PILLAR__ DNS__DOMAIN__ /$domain/g; s/__PILLAR__ DNS__SERVER__ /$kubedns/g" nodelocaldns.yaml
如果kube-proxy使用IPVS模式
1 sed -i "s/__PILLAR__ LOCAL__DNS__ /$localdns/g; s/__PILLAR__ DNS__DOMAIN__ /$domain/g; s/__PILLAR__ DNS__SERVER__ //g; s/__PILLAR__ CLUSTER__DNS__ /$kubedns/g" nodelocaldns.yaml
需要注意的是这里使用 DaemonSet 部署 node-local-dns 使用了 hostNetwork=true,会占用宿主机的 8080 端口,所以需要保证该端口未被占用。
1
2
3
4
5
6
7
8
containers: image: k8s.gcr.io/k8s-dns-node-cache:1.15 .13 resources: requests: cpu: 25 m memory: 5 Mi args: [ "-localip" , "169.254.20.10" , "-conf" , "/etc/Corefile" , "-upstreamsvc" , "kube-dns-upstream" ]
注意:在args参数这里”169.254.20.10”会多一个“逗号”记得删除不然启动报错。
到这里还没有完,如果 kube-proxy 组件使用的是 ipvs 模式的话我们还需要修改 kubelet 的 --cluster-dns 参数,将其指向 169.254.20.10,Daemonset 会在每个节点创建一个网卡来绑这个 IP,Pod 向本节点这个 IP 发 DNS 请求,缓存没有命中的时候才会再代理到上游集群 DNS 进行查询。 iptables 模式下 Pod 还是向原来的集群 DNS 请求,节点上有这个 IP 监听,会被本机拦截,再请求集群上游 DNS,所以不需要更改 --cluster-dns 参数。
1
2
$ sed -i 's/10.96.0.10/169.254.20.10/g' /var/ lib/kubelet/ config.yaml
我们可以部署一个新的 Pod 来验证下
1
2
3
4
5
6
7
8
9
10
11
12
13
14
15
16
17
[root@devops010015001003 ~]# cat busybox.yaml apiVersion: v1kind: Podmetadata: name: busybox namespace: defaultspec: nodeSelector: coredns: "2" containers: image: zhangguanzhang/centos command: "3600" imagePullPolicy: IfNotPresent restartPolicy: Always
1 2 3 4 5 6 7 8 9 10 11 12 13 14 15 16 17 18 19 20 21 22 23 24 [root@devops010015001003 ~ ]Server: 169.254 .20 .10 Address: 169.254 .20 .10 Non-authoritative answer: www.baidu.com canonical name = www.a.shifen.com. Name: www.a.shifen.com Address: 39.156 .66 .14 Name: www.a.shifen.com Address: 39.156 .66 .18 root@devops010015001003 ~ ]Server: 169.254 .20 .10 Address: 169.254 .20 .10 Name: nginx.default.svc.cluster.local Address: 10.101 .191 .0 root@devops010015001003 ~ ]Server: 169.254 .20 .10 Address: 169.254 .20 .10 Name: kubernetes.default.svc.cluster.local Address: 10.96 .0 .1
我们可以看到 nameserver 已经变成 169.254.20.10 了,当然对于之前的历史 Pod 要想使用 node-local-dns 则需要重建,当然如果要想去跟踪 DNS 的解析过程的话可以去通过抓包来观察。
使用CoreDNS 自定义域名失效 在使用NodeLocal DNS后遇到个问题就是自定义域名无法解析
kubernetes coredns 添加自定义DNS解析记录:coredns 自带 hosts 插件, 允许像配置 hosts 一样配置自定义 DNS 解析,修改 kube-system 中 configMap 的 coredns 添加如下设置即可。
1
2
3
4
5
6
7
8
9
10
11
12
13
14
15
16
17
18
19
20
21
22
23
24
kubectl get cm -o wide -n kube-system53 {.local in -addr.arpa ip6.arpa {in -addr.arpa ip6.arpa 172.21 .91.28 cache.redis 10.151 .30.11 git.k8s .local 9153 .conf 30
配置完成后,始终解析不了这个自定义的域名:
1 2 3 4 5 6 7 8 9 10 11 12 13 14 [root@devops 010015001003 ~]169.254 .20 .10 169.254 .20 .10 find git.k8s.local : NXDOMAINwith exit code 1 @devops 010015001003 ~]169.254 .20 .10 169.254 .20 .10 find cache.redis: NXDOMAINwith exit code 1
我们就直接使用 CoreDNS 的地址来进行解析测试一番:
1 2 3 4 5 6 7 8 9 10 11 12 13 14 15 16 17 18 [root@devops010015001003 ~ ]Server: 10.96 .0 .10 Address: 10.96 .0 .10 Name: cache.redis Address: 172.21 .91 .28 ** server can't find cache.redis: NXDOMAIN command terminated with exit code 1 root@devops010015001003 ~ ]Server: 10.96 .0 .10 Address: 10.96 .0 .10 Name: git.k8s.local Address: 10.151 .30 .11 ** server can't find git.k8s.local: NXDOMAIN command terminated with exit code 1
发现居然是正确的,那也就说明 CoreDNS 的配置是没有任何问题的,问题肯定就是 NodeLocal DNSCache 导致的,直接用 LocalDNS 的地址(169.254.20.10)解析发现确实是失败的:
1 2 3 4 5 6 7 [root@devops 010015001003 ~]169.254 .20 .10 169.254 .20 .10 find git.k8s.local : NXDOMAINwith exit code 1
这个时候只能去查看 LocalDNS 的 Pod 日志了:
1 2 3 4 5 6 7 8 9 10 11 12 13 14 15 16 17 18 19 20 21 22 23 24 25 26 27 28 29 30 31 32 33 34 35 36 37 38 39 40 41 42 43 44 45 46 47 48 49 50 51 52 53 54 55 56 57 58 59 [root@devops010015001003 ~]# kubectl logs node-local-dns-58 zhf -n kube-system 2020/06/02 05 :00 :32 [INFO] Updated Corefile with 0 custom stubdomains and upstream servers /etc/resolv.conf2020/06/02 05 :00 :32 [INFO] Using config file:53 {9984 30 9984 5 169.254.20.10 10.96.0.10 {9253 169.254.20.10 :8080 53 {30 169.254.20.10 10.96.0.10 {9253 53 {30 169.254.20.10 10.96.0.10 {9253 53 {30 169.254.20.10 9253 2020/06/02 05 :00 :32 [INFO] Added interface - nodelocaldns53 on 169.254.20.10 53 on 169.254.20.10 53 on 169.254.20.10 53 on 169.254.20.10 6d e79febbb00e443750acee66a370b43 1 .6 .7 11 .13 ,
仔细分析上面的 LocalDNS 的配置信息,其中 10.96.0.10 为 CoreDNS 的 Service ClusterIP,169.254.20.10 为 LocalDNS 的 IP 地址,10.103.178.36 是 LocalDNS 新建的一个 Service ClusterIP,该 Service 和 CoreDNS 一样都是关联以前的 CoreDNS 的 Endpoints 列表。
仔细观察可以发现 cluster.local、in-addr.arpa 以及 ip6.arpa 都会通过 forward 转发到 10.96.0.10,也就是去 CoreDNS 解析,其他的则是 forward . /etc/resolv.conf 通过 resolv.conf 文件去解析,该文件的内容如下所示:
1 2 3 4 5 6 7 8 9 10 11 .:53 {30 169.254 .20.10 /etc/ resolv.conf {9253
我们发现这个变量 __PILLAR__UPSTREAM__SERVERS__ 会自动替换为 /etc/resolv.conf 这样的话我们的自定义的域名就无法通过CoreDNS解析,所以我们需要修改为 CoreDNS 或 LocalDNS 的SVC地址这样就能解析了。
1
2
3
4
5
[root@devops010015001003 ~]# kubectl get svc -n kube-system NAME TYPE CLUSTER -IP EXTERNAL -IP PORT(S) AGE10.109 .91 .45 <none > 5473 /TCP 5 d19h10.96 .0 .10 <none > 53 /UDP,53 /TCP,9153 /TCP 11 d10.103 .178 .36 <none > 53 /UDP,53 /TCP 34 m
修改为:
1 2 3 4 5 6 7 8 9 10 11 .:53 {30 169.254 .20.10 10.103 .178.36 {9253
对于使用 NodeLocalDNS 的用户一定要注意这个问题,如果使用 hosts 或者 rewrite 插件失效,基本上就是这个问题造成的。排查问题通过日志去分析始终是最好的手段。