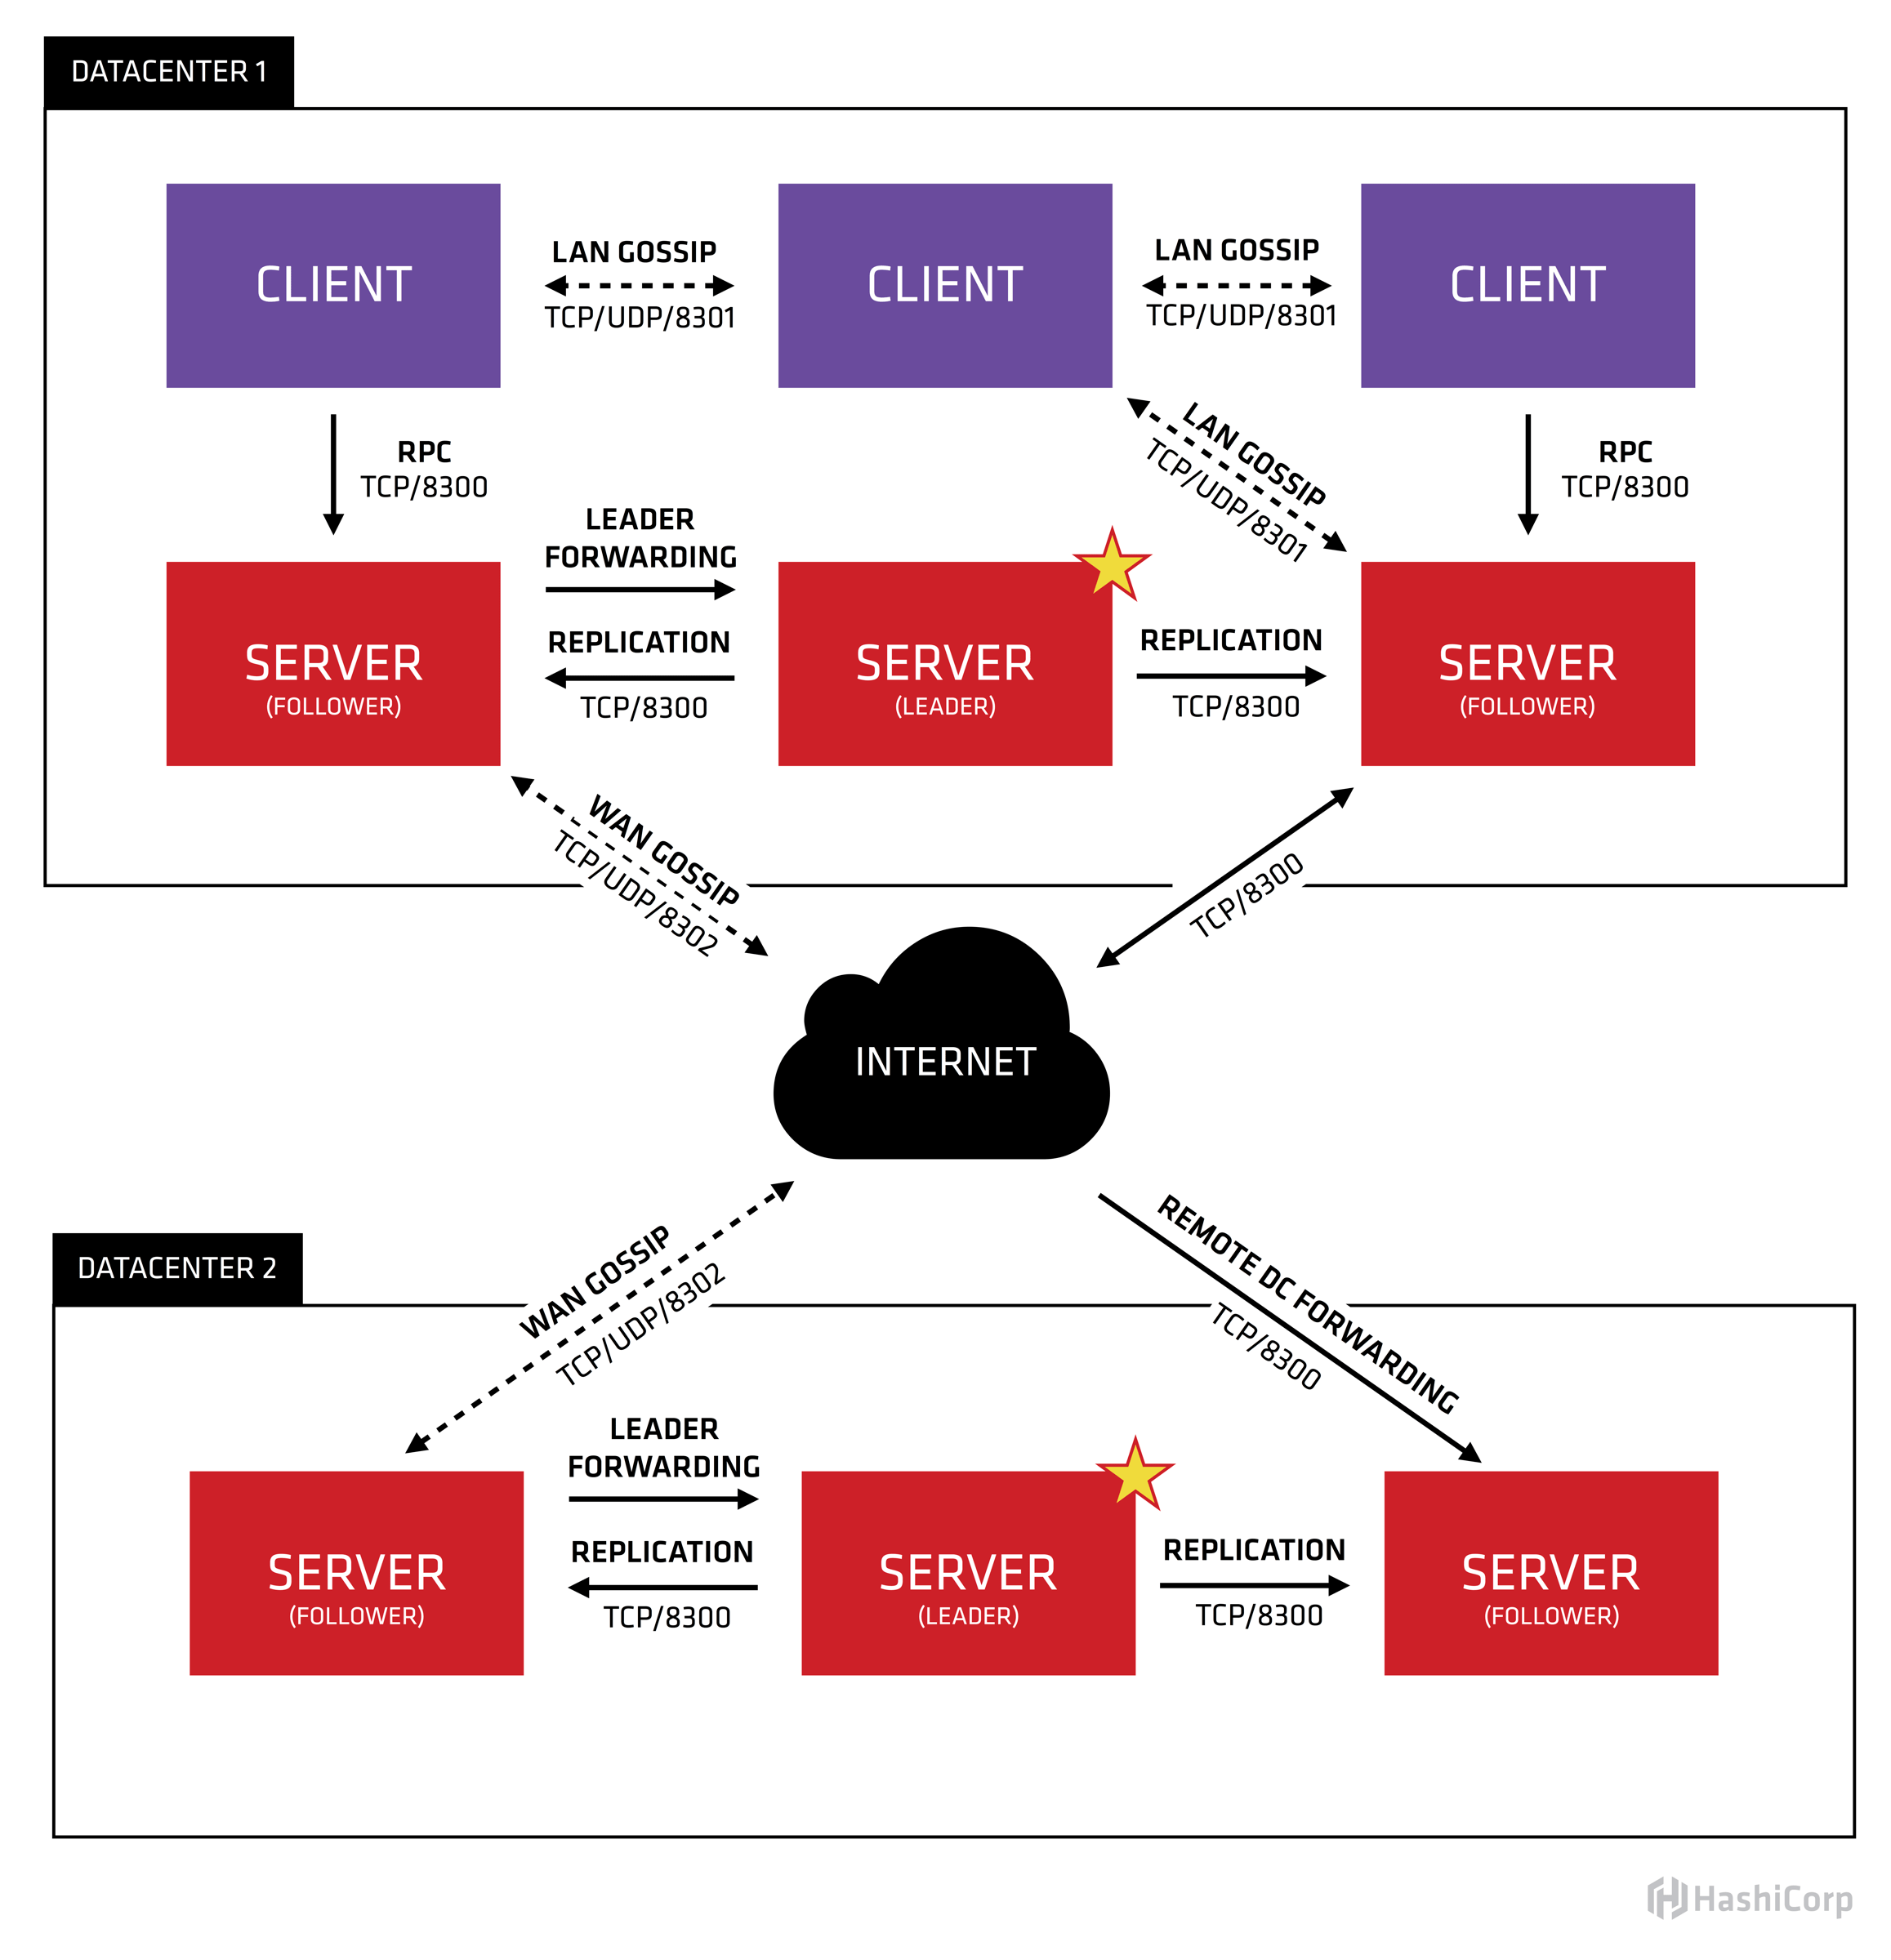
Consul架构图
首先Consul支持多数据中心,在上图中有两个DataCenter,他们通过Internet互联,同时请注意为了提高通信效率,只有Server节点才加入跨数据中心的通信。
在单个数据中心中,Consul分为Client和Server两种节点(所有的节点也被称为Agent),Server节点保存数据,Client负责健康检查及转发数据请求到Server;Server节点有一个Leader和多个Follower,Leader节点会将数据同步到Follower,Server的数量推荐是3个或者5个,在Leader挂掉的时候会启动选举机制产生一个新的Leader。
集群内的Consul节点通过gossip协议(流言协议)维护成员关系,也就是说某个节点了解集群内现在还有哪些节点,这些节点是Client还是Server。单个数据中心的流言协议同时使用TCP和UDP通信,并且都使用8301端口。跨数据中心的流言协议也同时使用TCP和UDP通信,端口使用8302。
集群内数据的读写请求既可以直接发到Server,也可以通过Client使用RPC转发到Server,请求最终会到达Leader节点,在允许数据轻微陈旧的情况下,读请求也可以在普通的Server节点完成,集群内数据的读写和复制都是通过TCP的8300端口完成。
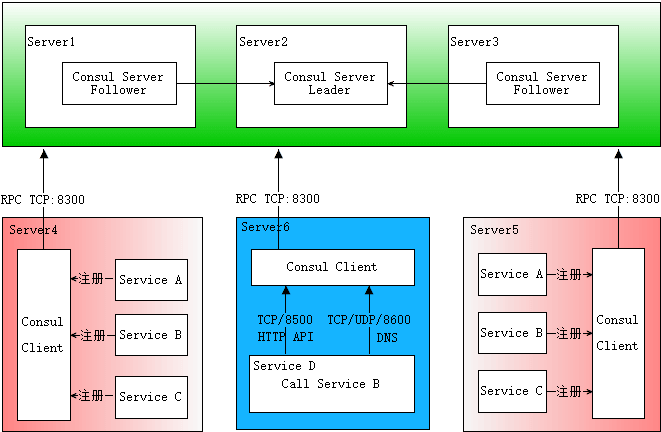
Consul服务发现原理 下面这张图是自己画的,基本描述了服务发现的完整流程,先大致看一下。
首先需要有一个正常的Consul集群,有Server,有Leader。这里在服务器Server1、Server2、Server3上分别部署了Consul Server,假设他们选举了Server2上的Consul Server节点为Leader。这些服务器上最好只部署Consul程序,以尽量维护Consul Server的稳定。
然后在服务器Server4和Server5上通过Consul Client分别注册Service A、B、C,这里每个Service分别部署在了两个服务器上,这样可以避免Service的单点问题。服务注册到Consul可以通过HTTP API(8500端口)的方式,也可以通过Consul配置文件的方式。Consul Client可以认为是无状态的,它将注册信息通过RPC转发到Consul Server,服务信息保存在Server的各个节点中,并且通过Raft实现了强一致性。
最后在服务器Server6中Program D需要访问Service B,这时候Program D首先访问本机Consul Client提供的HTTP API,本机Client会将请求转发到Consul Server,Consul Server查询到Service B当前的信息返回,最终Program D拿到了Service B的所有部署的IP和端口,然后就可以选择Service B的其中一个部署并向其发起请求了。如果服务发现采用的是DNS方式,则Program D中直接使用Service B的服务发现域名,域名解析请求首先到达本机DNS代理,然后转发到本机Consul Client,本机Client会将请求转发到Consul Server,Consul Server查询到Service B当前的信息返回,最终Program D拿到了Service B的某个部署的IP和端口。
相关端口 8300 – TCP agent server 使用的,用于处理其他agent发来的请求
部署前准备
IP
nodeName
CPU
Memory
role
10.15.1.46
consul-server-1
4
8G
server
10.15.1.48
consul-server-1
4
8G
server
10.15.1.49
consul-server-1
4
8G
server
10.15.1.7
consul-client-1
4
8G
client
修改hosts文件 1 2 3 4 10.15.1.46 consul-server-1 10.15.1.48 consul-server-2 10.15.1.49 consul-server-3 10.15.1.7 consul-client-1
部署安装 下载最新版本并解压
1 2 3 4 5 wget https://releases.hashicorp.com/consul/1 .9 .0 /consul_1.9 .0 _linux_amd64.zipunzip consul_1.9 .0 _linux_amd64.zipchown root:root consulmv consul /usr/bin/consul --version
设置tab自动补全
1 2 consul -autocomplete-install/usr/ bin/consul consul
创建一个无特权的系统用户来运行Consul并创建其数据目录。
1 2 3 useradd --system --home /etc/ consul.d --shell /bin/ false consul/var/ lib/consul/var/ lib/consul
创建TLS证书 step 1: 创建ca 为了简单起见,这里我使用Consul的内置TLS助手来创建基本的CA。您只需为数据中心创建一个CA。您应该在用于创建CA的同一服务器上生成所有证书。
1 2 3 consul tls ca create -days= 36500 = = > Saved consul-agent-ca.pem= = > Saved consul-agent-ca-key.pem
CA证书consul-agent-ca.pem包含验证Consul证书所需的公钥,因此必须分发给运行consul代理的每个节点。
CA密钥,consul-agent-ca-key.pem将用于为Consul节点签署证书,并且必须保持私有。拥有此密钥,任何人都可以将Consul作为受信任的服务器运行,并访问所有Consul数据,包括ACL令牌。
step2: 创建server角色的证书 这里数据中心默认名字为dc1,其他的自行选项赋值。在创建CA的同一台服务器上重复此过程,直到每台服务器都有一个单独的证书。该命令可以反复调用,它将自动增加证书和密钥号。您将需要将证书分发到服务器。
1 2 3 4 5 6 7 8 9 10 11 12 13 14 15 16 17 18 19 20 21 22 23 24 $ consul tls cert create -server -dc=dc1 -days=36500 WARNING : Server Certificates grants authority to become aserver and access all state in the cluster including root keysand all ACL tokens. Do not distribute them to production hostsnot server nodes. Store them as securely as CA keys.Using consul-agent-ca.pem and consul-agent-ca-key.pemserver -consul-0. pemserver -consul-0 -key.pemcreate -server -dc=dc1 -days=36500 WARNING : Server Certificates grants authority to become aserver and access all state in the cluster including root keysand all ACL tokens. Do not distribute them to production hostsnot server nodes. Store them as securely as CA keys.Using consul-agent-ca.pem and consul-agent-ca-key.pemserver -consul-1. pemserver -consul-1 -key.pemcreate -server -dc=dc1 -days=36500 WARNING : Server Certificates grants authority to become aserver and access all state in the cluster including root keysand all ACL tokens. Do not distribute them to production hostsnot server nodes. Store them as securely as CA keys.Using consul-agent-ca.pem and consul-agent-ca-key.pemserver -consul-2. pemserver -consul-2 -key.pem
为了对Consul服务器进行身份验证,服务器会提供一种特殊的证书-包含server.dc1.consul在中Subject Alternative Name。如果启用verify_server_hostname,则仅允许提供此类证书的代理作为服务器引导。没有verify_server_hostname = true攻击者,可能会破坏Consul客户端代理,并以server身份重新启动该agent,以便访问您数据中心中的所有数据!这就是服务器证书很特殊的原因。
step3: 创建client角色的证书 Consul 1.5.2中引入的自动加密方法减轻了运维生成和分发client证书步骤。这里我是高于1.5.2的,不需要为每个客户端创建证书,客户端只需要拥有consul-agent-ca.pem这个ca下,会自动从server获取client证书存在内存中,并不会持久化到本地。
1 2 3 4 5 6 7 "verify_incoming" : false , "verify_outgoing" : true , "verify_server_hostname" : true , "ca_file" : "/etc/consul.d/consul-agent-ca.pem" , "auto_encrypt" : { "tls" : true } ,
step4: 创建cli的证书 用于连接管理consul server
1 2 3 4 $ consul tls cert create -cli -dc=dc1 -days=36500=> Using consul-agent-ca.pem and consul-agent-ca-key.pem => Saved dc1-cli-consul-0 .pem => Saved dc1-cli-consul-0 -key.pem
文件列表
1 2 3 4 5 6 7 8 9 10 11 $ ll 1 root root 227 Oct 11 10:36 consul-agent-ca-key.pem 1 root root 1249 Oct 11 10:36 consul-agent-ca.pem 1 root root 227 Oct 11 11:47 dc1-cli-consul-0-key.pem 1 root root 1082 Oct 11 11:47 dc1-cli-consul-0.pem 1 root root 227 Oct 11 10:42 dc1-server-consul-0-key.pem 1 root root 1139 Oct 11 10:42 dc1-server-consul-0.pem 1 root root 227 Oct 11 10:43 dc1-server-consul-1-key.pem 1 root root 1139 Oct 11 10:43 dc1-server-consul-1.pem 1 root root 227 Oct 11 10:43 dc1-server-consul-2-key.pem 1 root root 1139 Oct 11 10:43 dc1-server-consul-2.pem
server和client以及cli的配置 consul配置可以采用HCL或JSON格式。HCL支持在Consul 1.0和更高版本中可用,现在需要在所有配置文件上使用.hcl或 .json扩展名以指定其格式。/consul/config读取配置信息,为了规范,配置文件我路径定义为/etc/consul.d/,数据目录定义为/var/lib/consul/
1 2 3 4 5 6 7 8 9 10 11 12 $ tree /etc/ consul.d//etc/ consul.d/0 -key.pem0 .pem0 -key.pem // 第一台server对应0 的证书,第二个就是1 0 .pem // 同上,下面的配置文件里指定的文件名也要一致
client:
1 2 3 4 5 $ tree /etc/ consul.d/etc/ consul.d/
server node_name 注意按照文章最开始的标题写,每个不一样/etc/consul.d/server/conf.json 配置内容为,缺省client_addr为127.0.0.1,如果是专门的机器跑 consul 这里需要修改为 bind 住0.0.0.0或者多网卡下专门指定的ip
1 2 3 4 5 6 7 8 9 10 11 12 13 14 15 16 17 18 19 20 21 22 23 24 25 26 27 28 29 30 31 { "data_dir" : "/var/lib/consul" , "node_name" : "consul-server-1" , "bootstrap_expect" : 3 , "bind_addr" : "10.15.1.46" , "client_addr" : "0.0.0.0" , "datacenter" : "dc1" , "domain" : "consul" , "log_level" : "INFO" , "start_join" : [ "10.15.1.46" , "10.15.1.48" , "10.15.1.49" ] , "retry_interval" : "2s" , "verify_incoming" : true , "verify_outgoing" : true , "verify_server_hostname" : true , "ca_file" : "/etc/consul.d/consul-agent-ca.pem" , "cert_file" : "/etc/consul.d/server/ssl/dc1-server-consul-0.pem" , "key_file" : "/etc/consul.d/server/ssl/dc1-server-consul-0-key.pem" , "auto_encrypt" : { "allow_tls" : true } , "ports" : { "http" : 8500 , "dns" : 8600 , "https" : 8501 } , "server" : true }
请注意:如果需要自动颁发client端证书需要设置"allow_tls": true
client node_name 注意按照文章最开始的标题写,每个不一样
client的配置 /etc/consul.d/client/conf.json
1 2 3 4 5 6 7 8 9 10 11 12 13 14 15 16 17 18 19 20 21 22 23 24 25 { "data_dir" : "/var/lib/consul/client" , "node_name" : "consul-client-1" , "datacenter" : "dc1" , "bind_addr" : "10.15.1.7" , "client_addr" : "0.0.0.0" , "retry_join" : [ "10.15.1.46" , "10.15.1.48" , "10.15.1.49" ] , "retry_interval" : "3s" , "verify_incoming" : false , "verify_outgoing" : true , "verify_server_hostname" : true , "ca_file" : "/etc/consul.d/consul-agent-ca.pem" , "auto_encrypt" : { "tls" : true } , "ports" : { "http" : 8500 , "dns" : 8600 , "https" : 8501 } }
请注意:要使用自动加密功能,您将需要配置client以自动从server获取证书,必须配置 "tls": true 。
cli consul当作cli使用的时候也得走tls,不然会下面报错
1 2 $ consul membersError retrieving members: Get http://127.0.0.1:8500/v1/agent/members?segment=_all: dial tcp 127.0.0.1:8500: connect: connection refused
路径根据实际来,证书最好是绝对路径,cli默认操作localhost上运行的consul,例如能够使用consul leave会让当前的consul退出集群,环境变量我们写子配置文件/etc/profile.d/consul-cli.sh
1 2 3 4 export CONSUL_HTTP_ADDR =https://localhost:8501export CONSUL_CACERT =/etc/consul.d/consul-agent-ca.pemexport CONSUL_CLIENT_CERT =/etc/consul.d/cli/ssl/dc1-cli-consul-0.pemexport CONSUL_CLIENT_KEY =/etc/consul.d/cli/ssl/dc1-cli-consul-0-key.pem
CONSUL_HTTP_ADDR是Consul代理的URL,并设置的默认值 -http-addr。
CONSUL_CACERT是CA证书的位置,并将设置为默认值-ca-file。
CONSUL_CLIENT_CERT是CLI证书的位置,并将设置为默认值-client-cert。
CONSUL_CLIENT_KEY是CLI键的位置,并将设置为默认值 -client-key。
启动 编辑 /usr/lib/systemd/system/consul.service
server启动参数 1 2 3 4 5 6 7 8 9 10 11 12 13 14 15 16 17 18 19 20 21 22 23 24 [Unit] Description ="Consul Startup process for server" Documentation =https://www.consul.io/Requires =network-on line.targetAfter =network-on line.targetConditionDirectoryNotEmpty =/etc/consul.d/server/conf.json[Service] User =consulGroup =consulEnvironmentFile =-/etc/sysconfig/consulPIDFile =/var/run/consul/consul.pidPermissionsStartOnly =true ExecStartPre =/usr/bin/consul validate /etc/consul.d/serverExecStart =/usr/bin/consul agent -config-dir=/etc/consul.d/serverExecReload =/bin/kill --signal HUP $MAINPID KillMode =processKillSignal =SIGTERMRestartSec =15 sRestart =on -failureLimitNOFILE =65536 [Install] WantedBy =multi-user.target
client启动参数 1 2 3 4 5 6 7 8 9 10 11 12 13 14 15 16 17 18 19 20 21 22 23 24 25 [Unit] Description ="Consul Startup process for client" Documentation =https://www.consul.io/Requires =network-on line.targetAfter =network-on line.targetConditionDirectoryNotEmpty =/etc/consul.d/client/conf.json[Service] Type =notifyUser =consulGroup =consulEnvironmentFile =-/etc/sysconfig/consulPIDFile =/var/run/consul/consul.pidPermissionsStartOnly =true ExecStartPre =/usr/bin/consul validate /etc/consul.d/clientExecStart =/usr/bin/consul agent -config-dir=/etc/consul.d/clientExecReload =/bin/kill --signal HUP $MAINPID KillMode =processKillSignal =SIGTERMRestartSec =15 sRestart =on -failureLimitNOFILE =65536 [Install] WantedBy =multi-user.target
测试 1 2 3 4 5 6 $ consul membersType Build Protocol DC Segmentserver -1 10.15 .1 .46 :8301 alive server 1.9 .0 2 dc1 <all >server -2 10.15 .1 .48 :8301 alive server 1.9 .0 2 dc1 <all >server -3 10.15 .1 .49 :8301 alive server 1.9 .0 2 dc1 <all >-1 10.15 .1 .7 :8301 alive client 1.9 .0 2 dc1 <default >
日志中有显示是否启用加密
1 2 3 4 5 6 7 8 9 Dec 25 16 :56 :38 k8s-n2 consul[27090 ]: ==> Starting Consul agent...Dec 25 16 :56 :38 k8s-n2 consul[27090 ]: Version: '1 .9 .0 'Dec 25 16 :56 :38 k8s-n2 consul[27090 ]: Node ID: '780 b3ba9-f466-8 d43-dc55-b52a686118bf'Dec 25 16 :56 :38 k8s-n2 consul[27090 ]: Node name: 'consul-client-1 'Dec 25 16 :56 :38 k8s-n2 consul[27090 ]: Datacenter: 'dc1' (Segment: '')Dec 25 16 :56 :38 k8s-n2 consul[27090 ]: Server: false (Bootstrap: false)Dec 25 16 :56 :38 k8s-n2 consul[27090 ]: Client Addr: [0.0.0.0] (HTTP: 8500, HTTPS: 8501, gRPC: -1, DNS: 8600) Dec 25 16:56:38 k8s-n2 consul[27090]: Cluster Addr: 10.15.1.7 (LAN: 8301, WAN: 8302) Dec 25 16:56:38 k8s-n2 consul[27090]: Encrypt: Gossip: false, TLS-Outgoing: true, TLS-Incoming: false, Auto-Encrypt-TLS: true
扩展 在consul中有个参数 leave 你可以把他设置到systemd中 ExecStop=/usr/bin/consul leave 如果未设置此选项,那么当此服务被停止时,该服务的所有进程都将会根据 KillSignal= 的设置被立即全部杀死,至于systemd如何设置可以去百度一下systemd的配置。执行 consul leave 时它将向集群的其余agent发送一条Leave消息,然后优雅地离开。默认情况下,Consul将leave视为一个永久离开,并且在启动时不会再次尝试加入集群。在client模式的agent上,这默认为true,对于server模式的agent上,这默认为false。可以使用 "leave_on_terminate": true 和 "rejoin_after_leave": true 配合使用。不建议使用,除非你是真的要退出consul集群。

